Blog Archive
-
▼
2010
(110)
-
▼
May
(27)
- I heart the new Gypsy Hide Contour Feature
- New Photo Application with the GYPSY update!! Love...
- Gypsy Updates Available
- Cricut Cutting Guide
- Our Circle Challenge Winners
- Welding 2 Images to Make a Shaped Card
- Grunge Flower
- Black and White Baby Boy Layout
- Wedding Bells
- Glitter Embossing
- New Cartridges coming out in JUNE and July!
- Graduation Card
- Circle Punch Flowers
- Circle Card with Resist Stamping Technique
- Make your OWN embellishments with Packing Tape!!
- What another beautiful day! We took the kids on t...
- New Challenge!
- Tri-fold Card from Wild Card
- Embossing without a Machine :)
- Stamp Winner
- Letterpress Time
- Thanks a Melon
- 1 month Anniversary
- Embossing with Ink, a variation on Letterpressing
- Robot Card
- Vinyl Art
- The Winner of the Heavy Metal Challenge!
-
▼
May
(27)
Tuesday, May 4, 2010
Robot Card
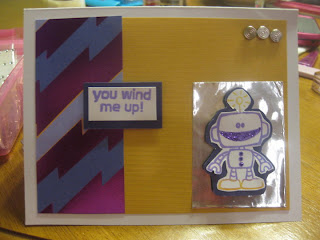
Since I am having camera trouble today, but still wanted to share--I will do this the "wordy" way.
The other day, during Michael's Scrapbook sale, I picked up these ADORABLE robot stamps. I am not normally into robots, but I fell in love with these little guys--and at $6, who wouldn't be in love?
During the metal challenge, I decided to use my cute little robots--it seemed appropriate.
For this project, you will need:
White premade card and envelope
Robot stamp
Yellow Carstock
Purple Cardstock
Metal brads
Microtip scissors
Metallic Paper
Fold card using bone folder, and cut yellow paper 1 inch less than the measurement of the card. So, if your card measures 5x7, cut the yellow mat to be 4x6.
Cut a border of purple cardstock the same height, but 2.5 inches wide. Glue both of these down on the card base, as shown starting with the yellow.
Stamp Mr. Robot on white cardstock, with purple and yellow ink. I used ColorBox Fluid Chalk in order to ink the stamp in different colors. (I just recently started using these, in addition to my other ink--and I love them! They dry quickly, and give a softer look. Plus, I love that I can ink a small stamp in more than one color using the corners of the "cat's eye")
Once, the image is stamped, cut out using microtip scissors. Glue to purple cardstock, and cut out the shape once again.
Pop-dot the robot to metallic paper, and glue the metallic paper to the bottom right hand corner. Use purple stickles, to accent the robot's mouth and "buttons"
Stamp a sentiment, on white cardstock and glue to purple cardstock. Pop-dot and place in between the purple and yellow cardstock in the middle. (The robot stamps I bought, came with a couple of sentiments)
Punch out 3 holes, using the Big Bite, to place 3 metal brads in top right corner. (If you don't have one of these, use a paper piercer. Keep on the lookout though, I have seen these as cheap as $10 at a local Walmart!)
Line the inside of the card, if you desire, and then you have a card fit for any robot-fan!

Subscribe to:
Post Comments (Atom)
Grab my Button!

Labels
- A Child's Year (4)
- Accent Essentials (8)
- Big Bite (3)
- Big Shot (11)
- Border Punches (3)
- Cricut (31)
- Cricut Markers (1)
- Cuttlebug (14)
- Don Juan (1)
- Doodlecharms (1)
- Embossing Powder (6)
- Food (19)
- Glitter (1)
- Gypsy (27)
- Gypsy Wanderings (3)
- Hannah Montana (1)
- Home Accents (2)
- I-Rock (3)
- Just Because (8)
- Letterpress (1)
- LIfe's a Beach (1)
- Live Simply (2)
- Love Struck (2)
- Lyrical Letters (3)
- Plantin Schoolbook (1)
- Shaped Punche (1)
- Shaped Punches (4)
- Sizzix Texturz (3)
- Stamping (2)
- Stamps (21)
- Stickles (6)
- Storage Ideas (1)
- Straight From the Nest (1)
- Stretch Your Imagination (3)
- The Cinch (2)
- Tim Holtz tiny Stapler (3)
- Tips (3)
- Vinyl (1)
- Wedding (1)
- Wild Card (3)


0 comments: